December 23, 2012

Marceille's Graham Cracker Cookies

For Christmas, I'm sharing my grandmother's Graham Cracker Cookie recipe with you... Enjoy!


1 box Graham Crackers
1 cup (2 sticks) Butter - substitutes won't work!
1 cup brown sugar
1/2 tsp. cinnamon
1/4 tsp. salt
1 cup chopped pecans (optional and yummy!)

Preheat oven to 350 degrees.

Break crackers into desired size (squares are good, but I used quarters since this batch was for a cookie exchange) and arrange flat on an ungreased jelly roll pan.  (Edges on the pan are important here!)


Combine butter, brown sugar, cinnamon, and salt in a saucepan.  Stir and heat on MEDIUM (so it doesn't burn) until caramel mixture boils. 


Boil 2 minutes and then spread over crackers with the help of a spoon. Sprinkle on pecans.


Bake 7-9 minutes (only 6 minutes in my extra-hot oven)


Immediately remove cookies one at a time to a cooling rack or well-buttered wax paper.


Merry Christmas!

- Erica


December 3, 2012

Christmas Card Wreath and Christmas Projects

I needed a way to get the beginnings of our stack of Christmas cards off of the dining room table, but I didn't have a lot around the house.
No better season to use what we already have, right?
I used a piece of card stock, but I think it would be best with an actual base for a wreath - a flat, wooden circle or even a cool metal one if that's your style.  Also on the list of supplies: scissors, pencil, markers and clothespins.
Using a bowl, I traced a circle and cut it out.  The hole in the circle (below) is what I used to start cutting out the middle of the circle.

I used my daughter's markers and made a candy-cane-looking pattern.  You could use fabric on a hard base, cork, or a flat color.


With the Crayola markers, I made some simple patterns on a few clothespins.  This would be way cool if they were painted with acrylic paint or sprinkled with glitter.  I've also seen some people cover them with a strip of scrapbooking pages.

 
Finally, I clipped my Christmas cards on and hung it on the wall.  As we get more cards in the mail, I'll add them. Because of the way my wreath is constructed, I have to put the cards evenly on both sides or it will spin around on the wall.


In other news, we've been busy making Christmas crafts...


...and enjoying some beautiful gifts (the baby AND the sweater).
 

November 30, 2012

Pattern Coming Soon!

I have made my first knit pattern ever and I'll be posting it soon! It's a pair of simple fingerless mitts that I'm calling...

"Early Morning Mitts" 


Yarn: Cascade Paints 100% Peruvian
Wool in "Grape."


I've been up during the wee hours lately with my new little boy, so I've had a lot of little moments here and there to get this accomplished. Before I post the pattern, I'm going to knit another pair and tweak things a little.

Keep your eyes peeled!

P.S.  I'd just like to say I'm really excited for Christmas cookies this year!

November 2, 2012

It's a Boy! and "I Love You" Hearts

Our little boy was born in October.

Baby sweater I knit early this fall.  It turns out the blue striping paid off, considering we had a boy.

"I Love You" hearts that I made for our little girl to carry in her pocket while we were away having a baby at the hospital.  I left an envelope of these at home for the Grandmas to hand out at their discretion.

I used fabric scraps, quilt batting scraps, and roughly sewed them with just a needle and thread.  Each heart is only about the size of a quarter.

 
I hope you're enjoying what is left of the fall weather. 
Me, I'm dreaming of Christmas lights and gingerbread cookies already - which is not a normal thing for me, but is something that I'm ok with. 

September 18, 2012

This week, I found a zippered pouch that I'd stored away and decided to personalize it a little.  It's made of duffle bag material, but a regular sewing needle went through it easily. I used 3 strands of embroidery floss and decided on a monogram for the "design".
 
First, I measured out the center and drew my "K" on the front with a ball point pen.  (I knew I'd be embroidering over it, so it wasn't a big deal to me.
 
I did a main outline in a light brown (above) and follwed in the empty spaces with light silver.

I finished with another solid line of dark silver... Ta-dah!

 This will be a good, manly diaper pouch for when my man takes our little girl to the park...

September 7, 2012

August 27, 2012

More Busy Summer Photos

We've been getting in as much fun time this summer as we can... I haven't had much time for pattern designing, but I have been working on projects like crazy to try and get everything finished before Baby arrives (in approximately 5 weeks or less).  


Sherburne National Wildlife Refuge
http://www.exploresherburne.org/

Sasqauatch Knitting Party that a Friend and I hosted...
A LOT of fun.
 
Baby Gift for a Friend


August 4, 2012

Playtime Ideas

My little girl likes to sit with me and pretend she's putting on make-up when I do, so I saved some old compacts, scraped out the makeup, and put a coat of acrylic paint on the inside.
 
I thought she'd feel like she has the fancy stuff.  Too bad she noticed I scraped all the old crusty make-up out. Apparently she liked that part...


July 7, 2012

Busy Summer


We've been enjoying a busy June and beginning of July. Busy - not like the swamped feeling of too much to do, but the feeling of trying to get the most out of the time that one possibly can.  We've been taking lots of trips to parks, lakes, the wading pool... and the craft store.  There happen to be a lot of babies on the way this year - how exciting! - and that means a lot of knitting and crocheting for me.  I love it.

Dam near St. Cloud State University, Mississippi River
(The water is very high this year.)

Knitting More... Crocheting Some
(Hat is From Norway with Love by Pickles)

Adventures at the Lake

Munsinger Gardens, St. Cloud Minnesota

June 3, 2012

Anja's Baby Hat

By Erica Knudson


This pattern is for babies 0-3 months. ** I've edited this page to add notes for making larger sizes -  at the bottom!

Materials used: Size H hook, worsted weight yarn, and a stitch marker to mark the start of each new row (if desired).


Anja's Baby Hat
By Erica Knudson


1. Chain 7 + 2 = 9 for base chain.

2. Dc in third ch from hook and across – 7

3. Turn, sl st across – 7

4. Turn, ch 2, dc in back loops across – 7


Rows 5 – 42: Repeat rows 3 & 4 until 13 inches long (21 dc rows total).


43. Sl st both ends of band together with RS facing out.

44. Sc 42 sts around edge of brim (in the same color as the brim). Sl st to join. – 42

45. Ch 2, dc around, sl st to join the round. Sl st to join. – 42

46. Repeat row 45 – 42

47. Repeat row 45 – 42

48. Ch 2, (dc in next 5 sts, dc2tog) around. Sl st to join. – 36

49. Ch 2, dc around. Sl st to join. – 36

50. Ch2, (dc in next 4 sts, dc2tog) around. Sl st to join. – 30

51. Ch2, (dc in next 3 sts, dc2tog) around. Sl st to join. – 24

52. Ch2, (dc in next 2 sts, dc2tog) around. Sl st to join. – 18

53. Ch2, (dc in next st, dc2tog) around. Sl st to join. – 12

54. (dc2tog) around Sl st to join. – 60

55. Dc2tog around until satisfied with the closure, between 3 and 5 times.

56. Fasten off. Weave in ends.


Key:

ch = chain
dc = double crochet
sl st = slip stitch
st = stitch
RS = right side
dc2tog = double crochet 2 together, a method of decreasing


**Please do not sell this pattern.

**If you wish to make a larger size,  you'll find this link helpful:  
For example,  if you'd want a 3-6 month size,  you'd  make your band 15 inches long.  You'd seam it according to the pattern and then pick up about 49 single crochet stitches  around for the body of the hat.  For this size,  the height of the hat would need to be at least 6 inches finished to cover those little ears.  When you can see you'd reach that height including the decreases,  just decrease evenly  until you reach the tip. I liked this hat just a little longer and pointier,  but you'll see what you like when you're making it.   

May 4, 2012

Spinning Again

A great gal in our local knitting group had a Wizard of Oz party.  We watched the movie, knit, spin, and ate some yummy themed treats (yellow brick road cheese and crackers, ruby-red-slipper-thread licorice, green punch, I'm Melting!-in-your-mouth brownies...).

I hadn't spun in almost a year - yikes - so I ordered a custom colorway from Wren in the Ivy (link here). It's modeled after the Emerald City, and I love it!

Wren in the Ivy
Custom Colorway - The Emerald City


Now I just have to try my hand at plying...

Until then, here's my work so far.  The colors are even more rich than the photos show...

April 19, 2012

Santa Cruz Cowl and Mitts


Santa Cruz Cowl and Mitts
By Erica Knudson

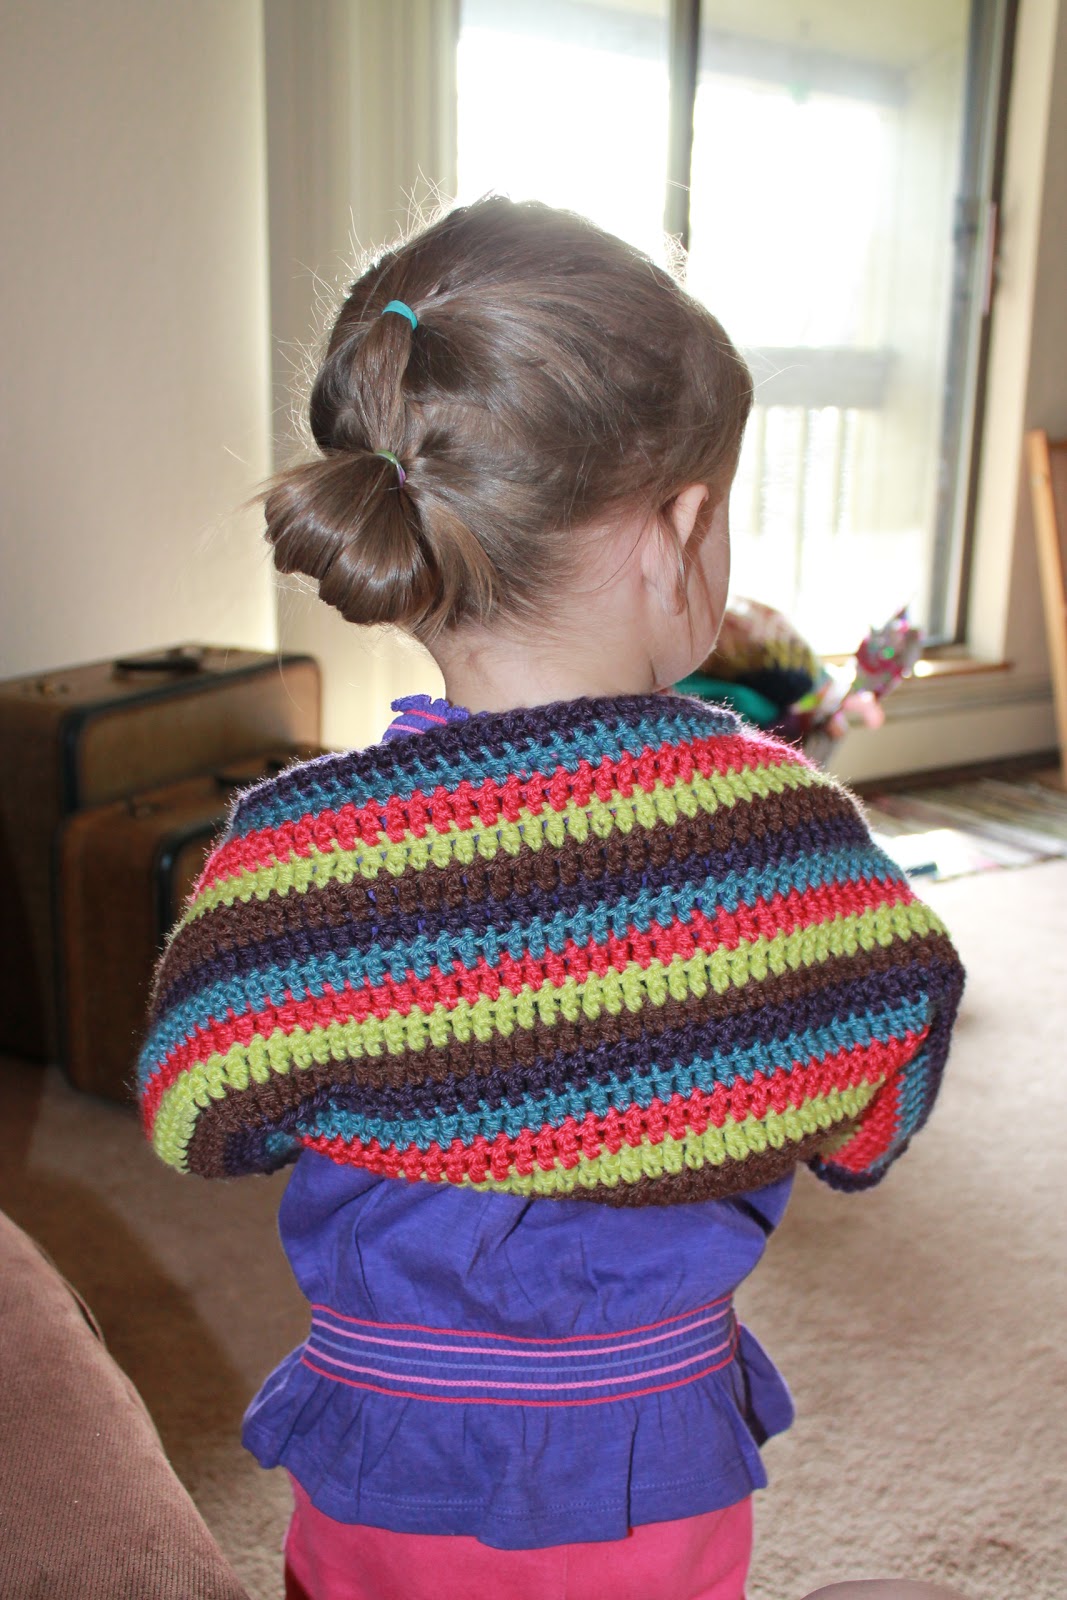
The examples in the photos were made with scraps of aran and worsted weight yarn, a size I crochet hook and stitch markers. The cowl and mitts are crocheted in-the-round.

I used a border color, of which you’d want a full skein, as well as portions of skeins from several other colors – probably ¼ skein for each. If you use a single color, I’d recommend having two full skeins available.

I completed the cowl first, reserving some of each color to use later in the mitts, and I crocheted both mitts at the same time, switching back and forth every couple of rows to ensure there was even coloring. If you use various colors, I recommend crocheting in the ends as you go to avoid a lot of work at the end.


Santa Cruz Cowl


Santa Cruz Cowl
By Erica Knudson
Chain 100 + 2 for base chain = 102.

Join with sl st, being careful not to twist.

1. (Using border color, if desired) Hdc in 3rd ch from hook and in each st around. Join. – 100

Place marker and move up with each round.

2. Ch 2, hdc in each st around. Join. – 100

3. (Starting with scrap yarn, if desired), Ch 2, hdc in each st around. Join. – 100

4. “Spaces Row”: Ch 2, hdc in first st, (ch1, skip 1 st, hdc in next st), repeat (…) through end of row. Join. – 50

5. “Spaces Row.” (see row 4 for instructions) Join. – 50

6. Ch2, hdc in each st around including ch sts. Join. – 100

For Rows 7 through 13: Repeat row 6.

If you’d like your finished cowl to be “taller” or appear thicker, you can add more Repeat Row 6 rows here.

14. “Spaces Row.” (see row 4 for instructions) Join. – 50

15. “Spaces Row.” (see row 4 for instructions) Join. – 50

16. Ch 2, hdc in each st around including ch sts. Join. – 100

For Rows 17 and 18: Repeat row 9 (using border color, if desired). Join. – 100

Fasten off. Weave in ends.

Key Below

Santa Cruz Mitts

Santa Cruz Mitts
By Erica Knudson


Chain 26 + 2 for base chain = 28.

Join with sl st, being careful not to twist.

1. (Using border color, if desired ) Hdc in 3rd ch from hook and in each st around. Join. – 26

Place marker and move up with each round.

2. Ch 2, hdc in each st around. Join. – 26

3. (Starting with scrap yarn, if desired), Ch 2, hdc in each st around. Join. – 26

4. “Spaces Row”: Ch 2, hdc in first st, (ch1, skip 1 st, hdc in next st), repeat (…) through end of row. Join. – 13

5. “Spaces Row.” (see row 4 for instructions) Join. – 13

6. Ch 2, hdc ineach st around including ch sts. Join. – 26

For Rows 7 through 13: Repeat row 6.

If you’d like your finished mitts to be “taller” or farther up the arm, you can add more Repeat Row 6 rows here.

14. Ch 2, hdc 22, turn. – 22

15. (Using border color, if desired) Ch 2, hdc 22, turn. – 22

16. Ch 2, hdc 22 ch 4, skip space and sl st to other side. – 22 – 4 chains = 26. Thumb hole is made.

17. Ch 2, hdc in each st around including ch sts. Join. – 26.

Fasten off. Weave in ends.

Key:
ch = chain

hdc = half double crochet

st = stitch

sl st = slip stitch


**This pattern is for personal use only. Thanks!

April 7, 2012

Toddler Striped Shrug

Toddler Striped Shrug
Erica Knudson

The example in the photo was made with worsted weight yarn and a size I crochet hook. (I changed yarn color for each stripe and used a single color for the border.)

Chain 70 + 2 for base chain – 72

1. Dc in third ch from hook and each st across – 70

2. Turn, ch 2, dc in each st across – 70

3. Repeat row 2 twelve (12) more times for a total of fourteen (14) rows or stripes.

4. Border:

Continue, as in last rows, with a ch 2 and dc across, but continue on around the entire border of the shrug. *I crocheted dc along the long edges and hdc along the short edges, which will be the arm holes. So, in each corner, I used 3 hdc to make it smooth.

Fasten off and weave in ends.

5. Seams:

Bring together long sides of rectangle with the “right side” facing out. One side at a time, on the long edges you brought together, sc 12 sts in from the end towards the middle. (Do this on the other side, also.)

Sl st, fasten off, and weave in ends. *I recommend using the same color to seam that you used in the border.


Key:

ch = chain
sc = single crochet
hdc = half double crochet
dc = double crochet
st = stitch
sl st = silp stitch


**This pattern is for personal use only.